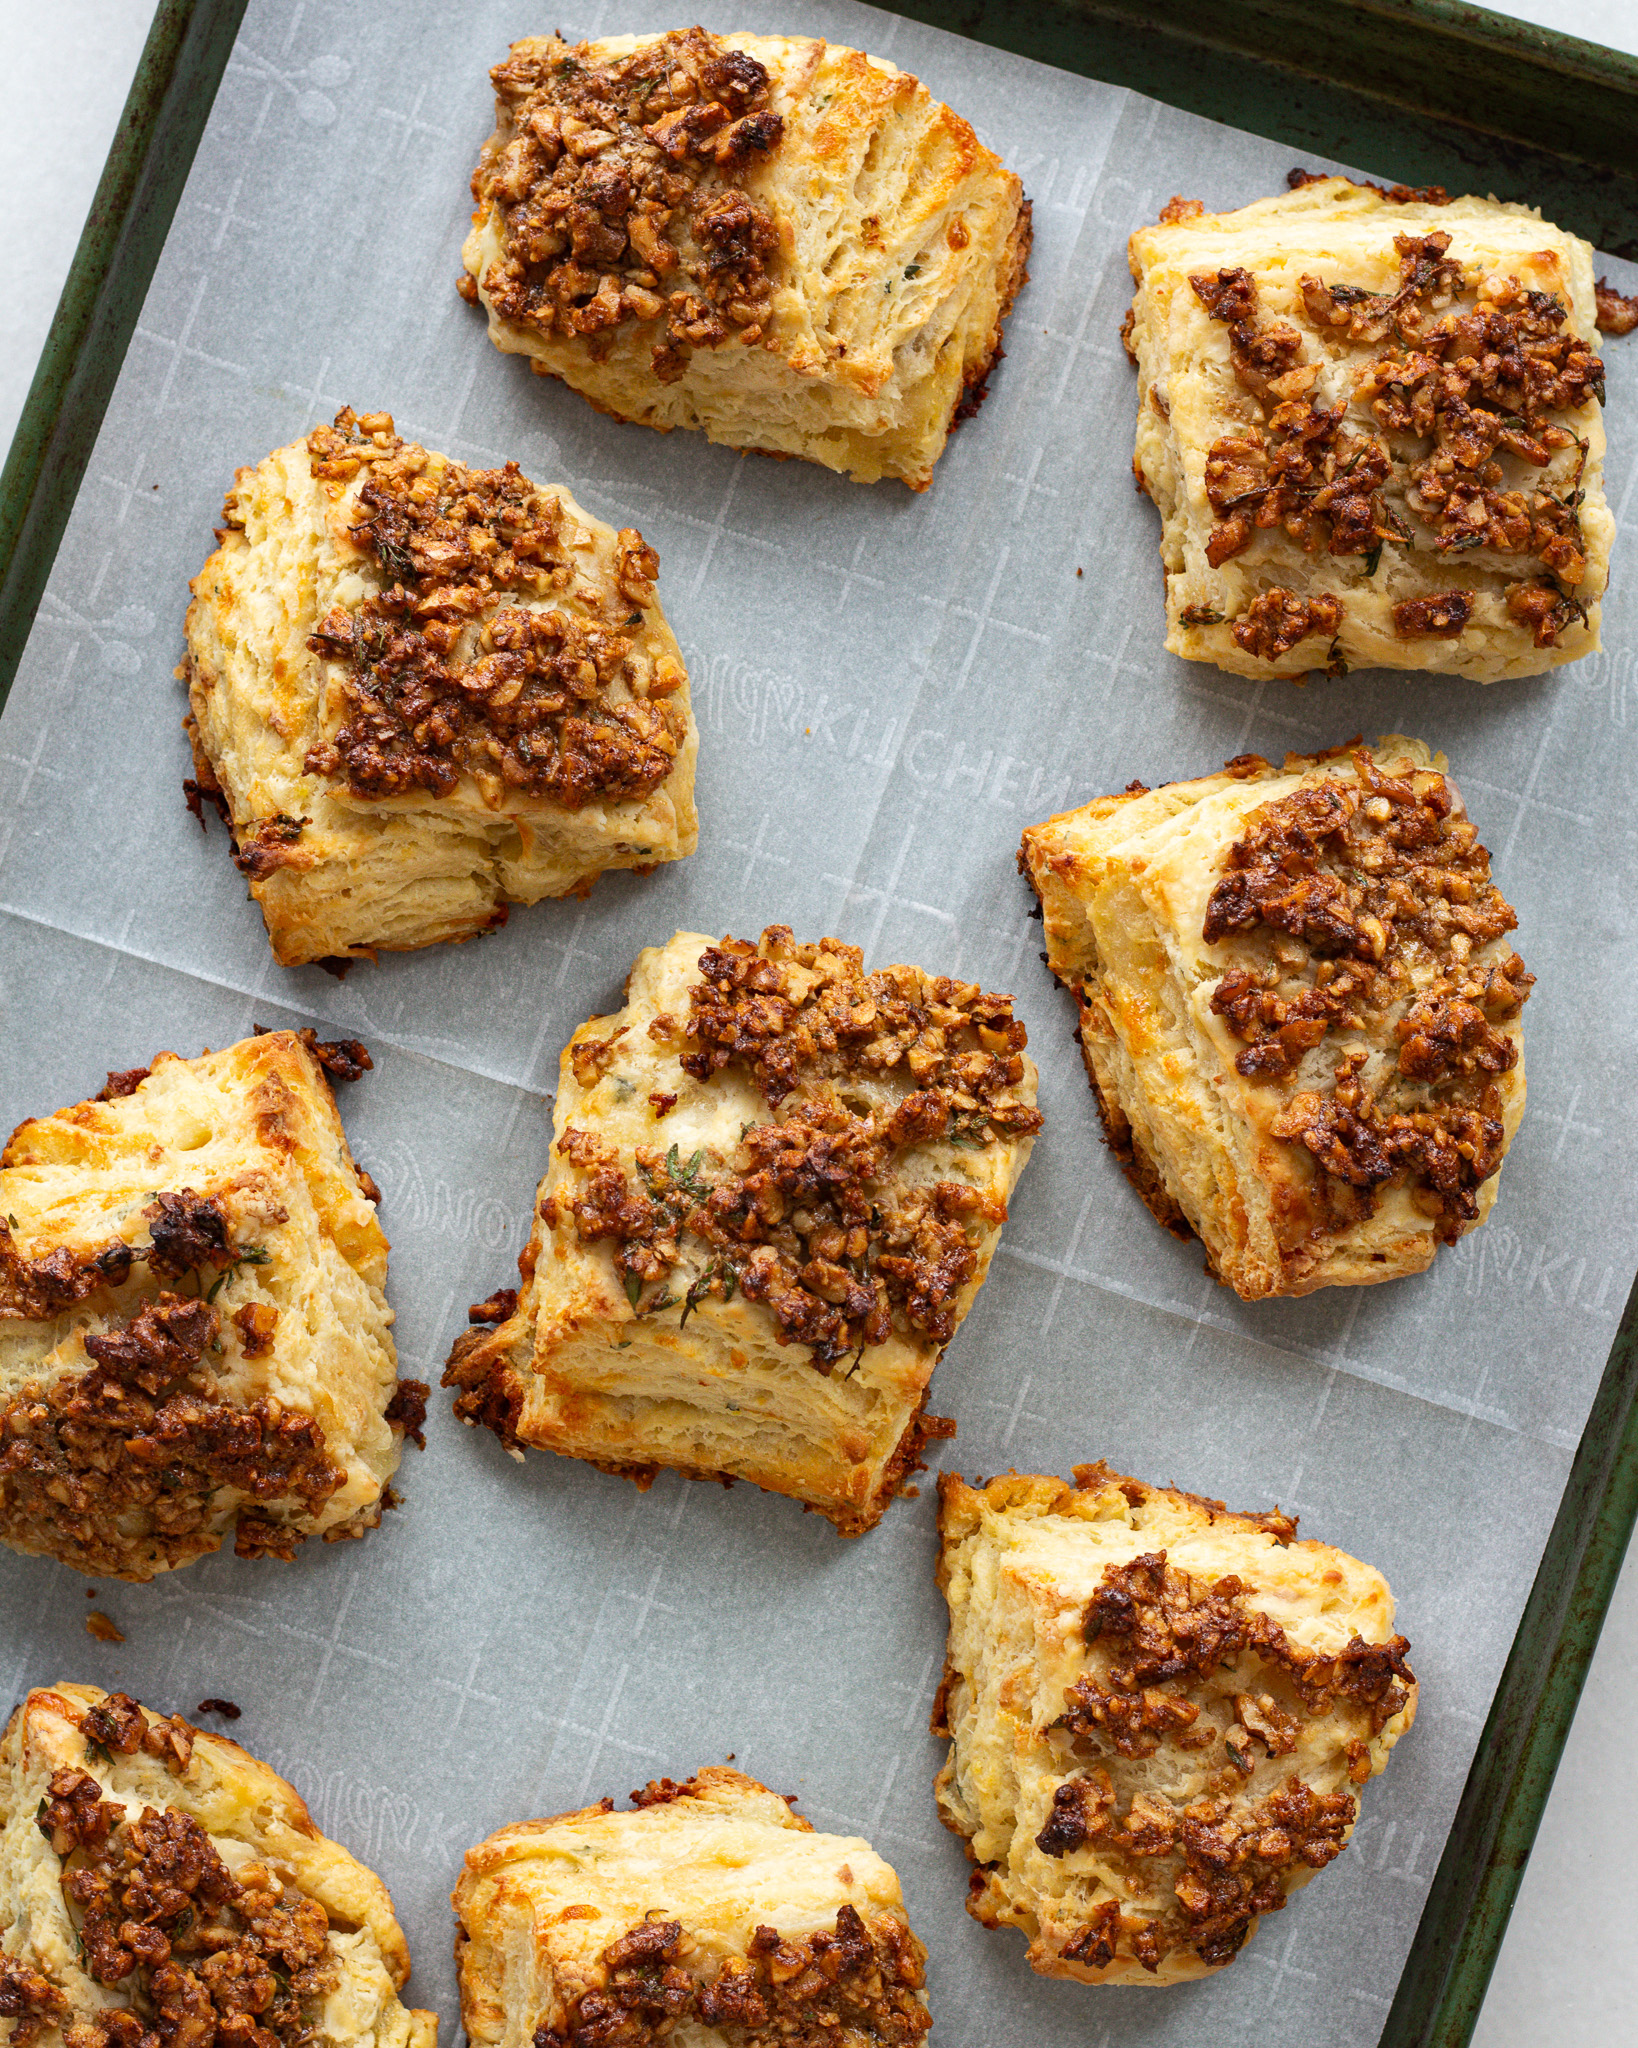

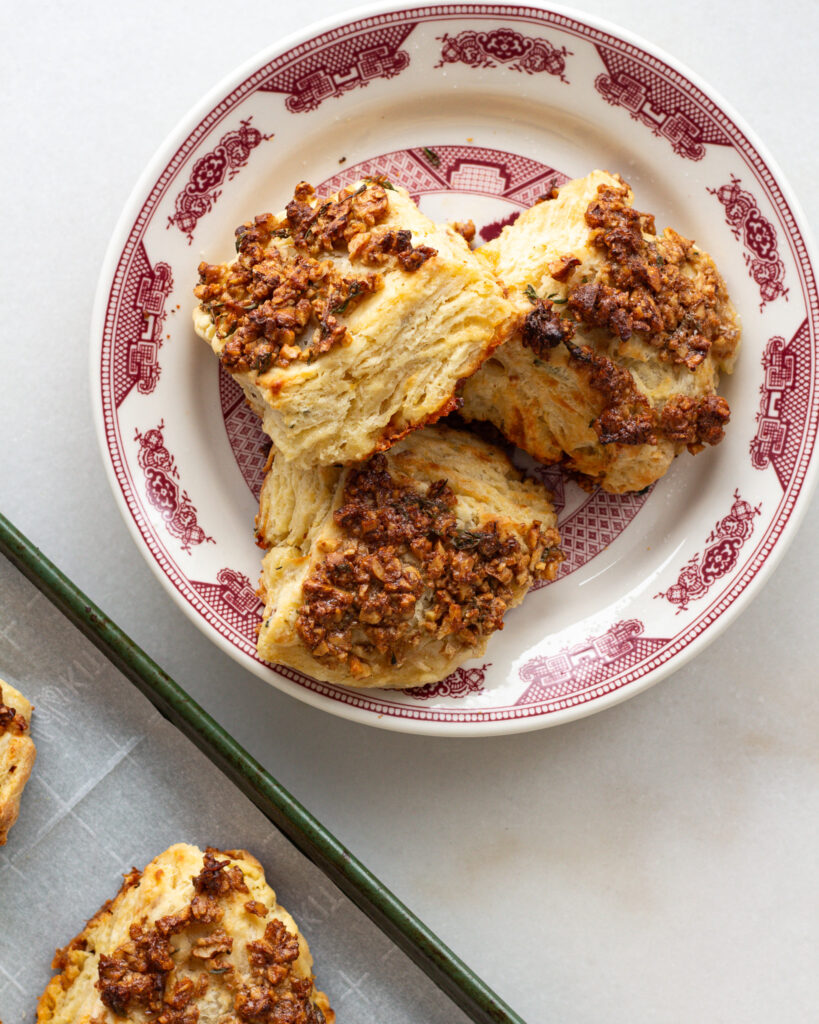
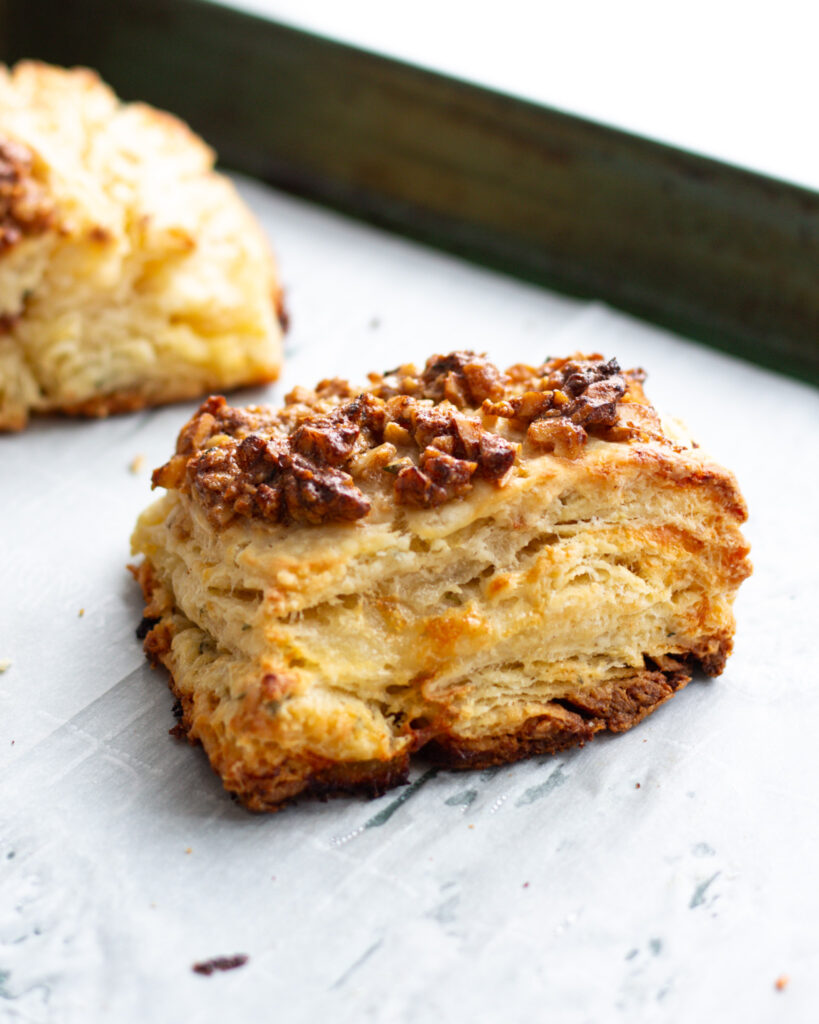
These biscuits are something special – camembert and roasted pear biscuits with lemon zest and thyme, plus a smattering of candied walnuts on top. It’s the perfect mix of both sweet and savory, with a few interesting flavors mingling in the mix.
I love this biscuit recipe for brunch with friends, a fun weekend baking activity, or just any time you have a fancy soft cheese lying around. Many, many cheeses will do. And most will get all crispy on the edges of the biscuits, creating what is truly biscuit heaven. Plus – the layers are insane. As far as unique biscuits go? It can’t be beat.
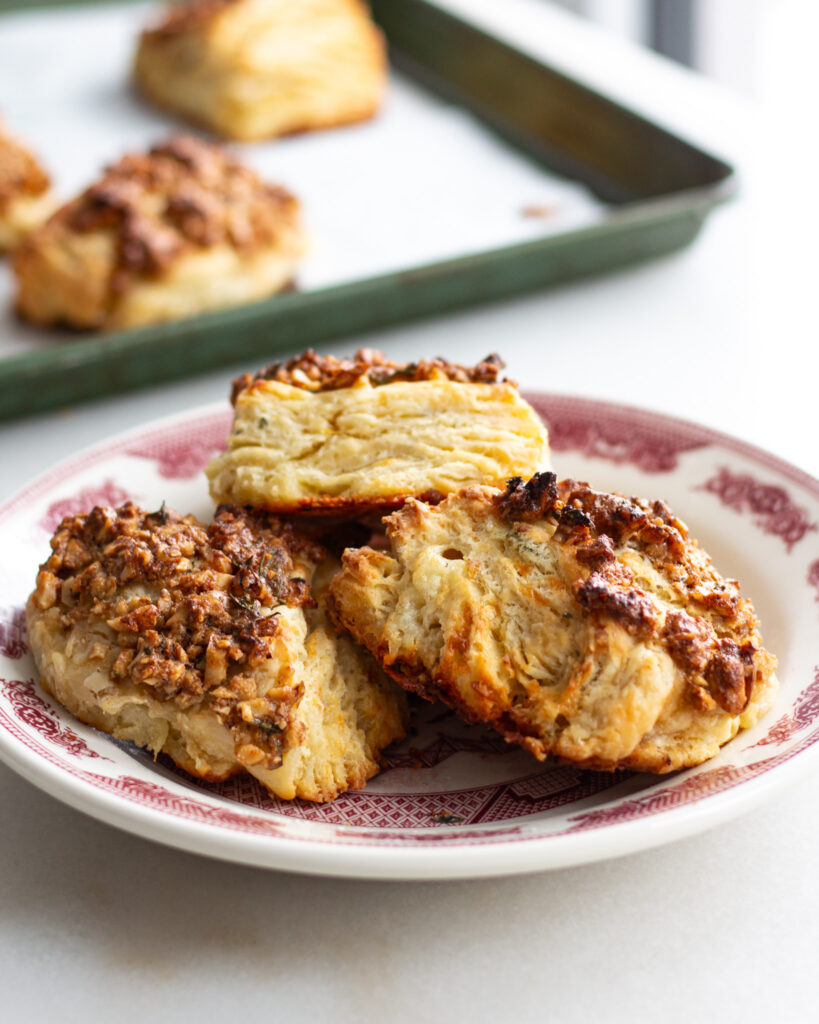
Table of contents

What you’ll need to make these camembert biscuits
These biscuits aren’t your average buttermilk biscuit (but yes…we do use buttermilk!). Here’s everything you’ll need for them:
- 1 small pear, 150 grams before coring
- 226 grams of salted butter (2 sticks)
- 100 grams camembert cheese (3.5 ounces)
- 420 grams all-purpose flour (3 cups)
- 1 tablespoon granulated sugar
- 1 tablespoon baking powder
- 2 teaspoons Diamond Crystal kosher salt
- 1 lemon, for zesting
- 3 tablespoons fresh thyme leaves, loosely packed
- 300 grams whole buttermilk, (1 1/4 cup) plus more for brushing
- 70 grams raw walnut halves (2/3 cup)
- 2 tablespoons brown sugar
- 1 egg white
What makes these biscuits special
There are four main layers of flavor to these biscuits, and they all play on the combination of sweet, nutty and savory. The roasted pear and cheese carry the show, but the thyme plays toward the biscuit’s savory notes, while the lemon plays toward the acid and sweetness. You can swap or switch out what you need to, but all together, these biscuits are phenomenal.
Sure, the recipe will still work if you switch out the cheese (or skip it entirely!) or if you forgo the walnut crust, but I just love having all the elements building each other up. It takes your standard biscuit and makes it an event.
Why camembert cheese?
Camembert is admittedly, a funny choice for this recipe. It’s a soft, surface-ripened cow’s milk cheese, meaning the rind holds a lot of the flavor, and it’s not a cheese typically sought after for baking or melting.
But I truly LOVE the flavor profile. And I LOVE how camembert almost disappears into a baked good like a biscuit, leaving pockets of cheese flavor and crispy edges where the cheese seeped out of the dough (but in a good way!)
If you are looking for a cheese to compare camembert to, think brie. It has the same subtle notes of creamy flavor, but it lacks brie’s butterfat that makes it difficult to slice and work with.
If you are looking for a substitute, I actually wouldn’t recommend brie. I’d recommend things alongside roquefort, chevre or fontina.
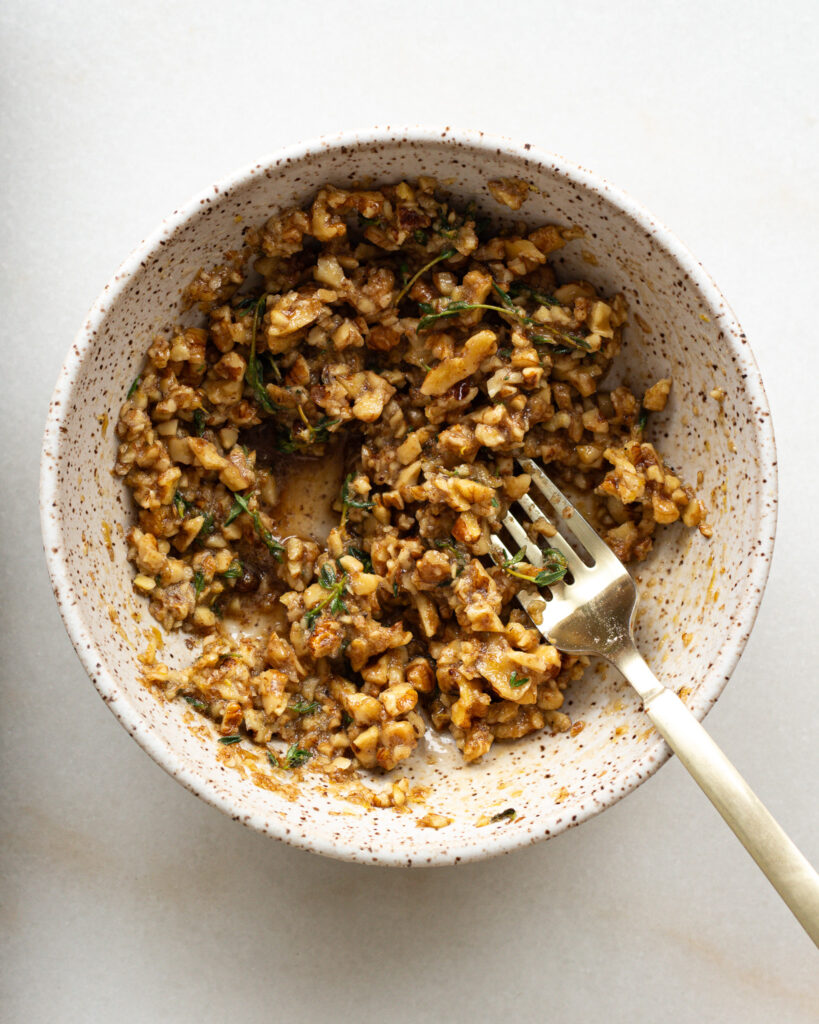
The key to the candied walnuts in this roasted pear biscuit
The crunchy, candied walnut topping is one of my favorite elements in this camembert & roasted pear biscuit recipe. However, its secret ingredient might be unexpected. The secret to the perfect walnut topping is a frothy egg white.
Many candied nut recipes call for an egg white that has been whisked until frothy. This egg white element allows the sugars to harden on the nuts, making a shell instead of a sticky mess. The same rule applies here: coat the walnuts and brown sugar with a frothy (and I mean FOAMY) egg white, and then they become crisp and candied in the oven as the biscuits bake!

How to prepare and assemble the camembert and roasted pear biscuits
This recipe is all about timing, and it’s best broken down into a step-by-step. Here’s everything you need to do, and when you need to do it!
- Position a rack to the center of the oven and preheat to 375°F.
- Puncture the pear with a fork a few times, wrap it in foil and roast in the oven for 40-45 minutes or until softened throughout.
- While the pear is roasting, cube the butter into 1-centimeter squared cubes, spread them on a baking sheet and transfer them to the freezer to chill for at least 15 minutes
- Cube the camembert (rind and all) into 1-centimeter squared cubes, add them to a bowl and transfer them to the fridge to chill for at least 15 minutes.
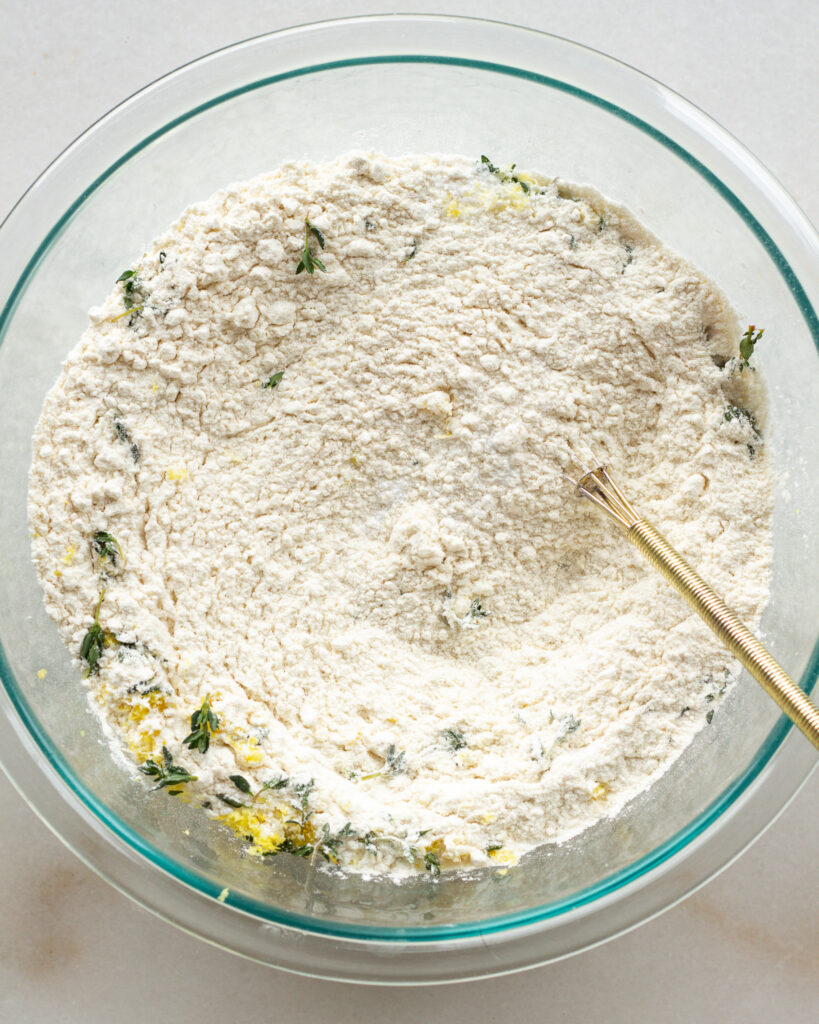
- In a large bowl, whisk together the flour, sugar, baking powder, salt, two teaspoons of lemon zest and two tablespoons of thyme leaves.
- Add the butter to the flour. Toss with your hands to coat each cube in flour, then press, flattening the cubes into discs. Continue to toss to make sure the butter is always coated in the flour. Add the cheese and mix into the dough. Pour in the buttermilk and mix into a shaggy dough. Transfer this to the fridge to chill while you slice the pear.
- When the pear is out of the oven, core and slice it into thin slices. Halve those slices crosswise and set them aside to reach room temperature.
- Pull the dough out of the fridge. Transfer it to a lightly floured surface and press it down into a 2-inch tall rectangle. Use a bench scraper to halve the dough. Put the halves on top of each other and press down, rotate 90 degrees and repeat. Dust the dough with more flour as needed, or when any butter or cheese is breaking out of the surface.
- Pat the dough down into a rectangle and cut it into thirds. Layer the pear slices on top of one piece of dough. Place another on top, layer with more pear, and place the last piece on top. Dust with flour and press this down into a rectangle no more than 2 inches tall.
- Wrap the dough in saran wrap and if needed, press it down with a rolling pin. Transfer this to the fridge to chill for 30 minutes.
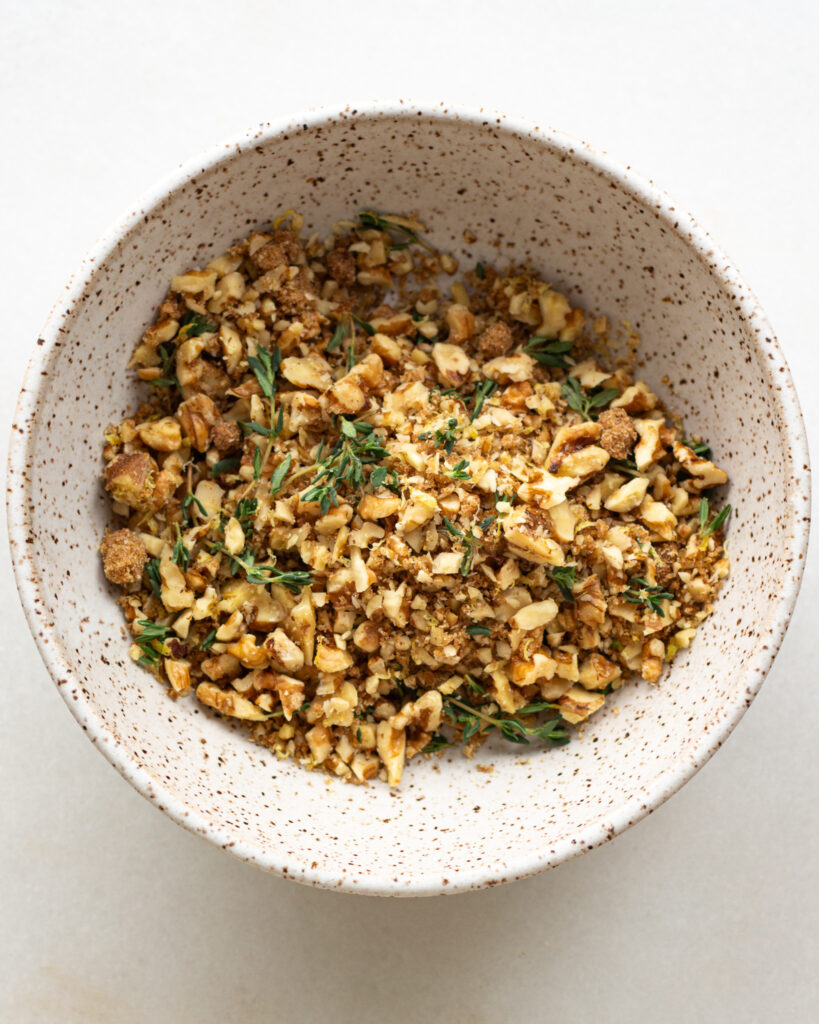
- While the dough is chilling. Finely chop the walnuts and add them to a bowl with 1 teaspoon lemon zest, 1 tablespoon thyme leaves and the brown sugar. Whisk an egg white until frothy and mix it in with the walnuts.
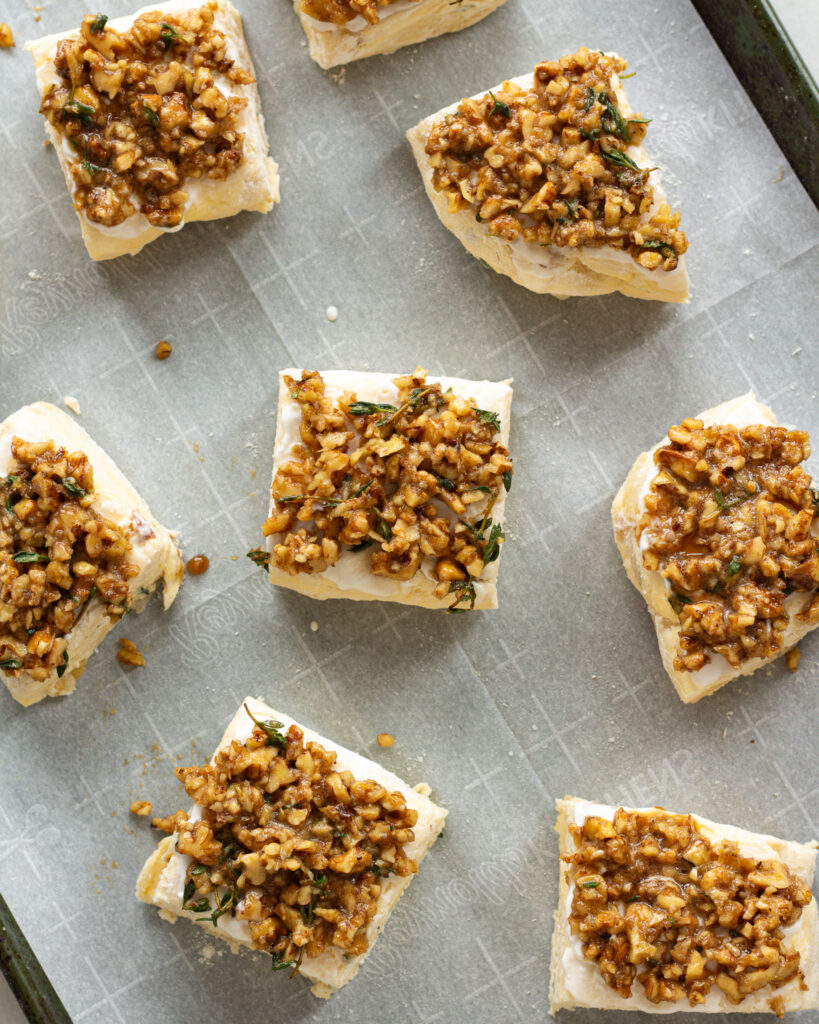
- When the dough has chilled, cut it into 9 even squares. Transfer them to a parchment-lined baking sheet and brush with a thin layer of buttermilk.
- Spread the walnut mixture on top of each biscuit. Bake for 30-35 minutes or until very golden brown. Serve warm!
Looking for similar recipes?
Here are a few other great baking options from the site!

Sugared Fig Scones
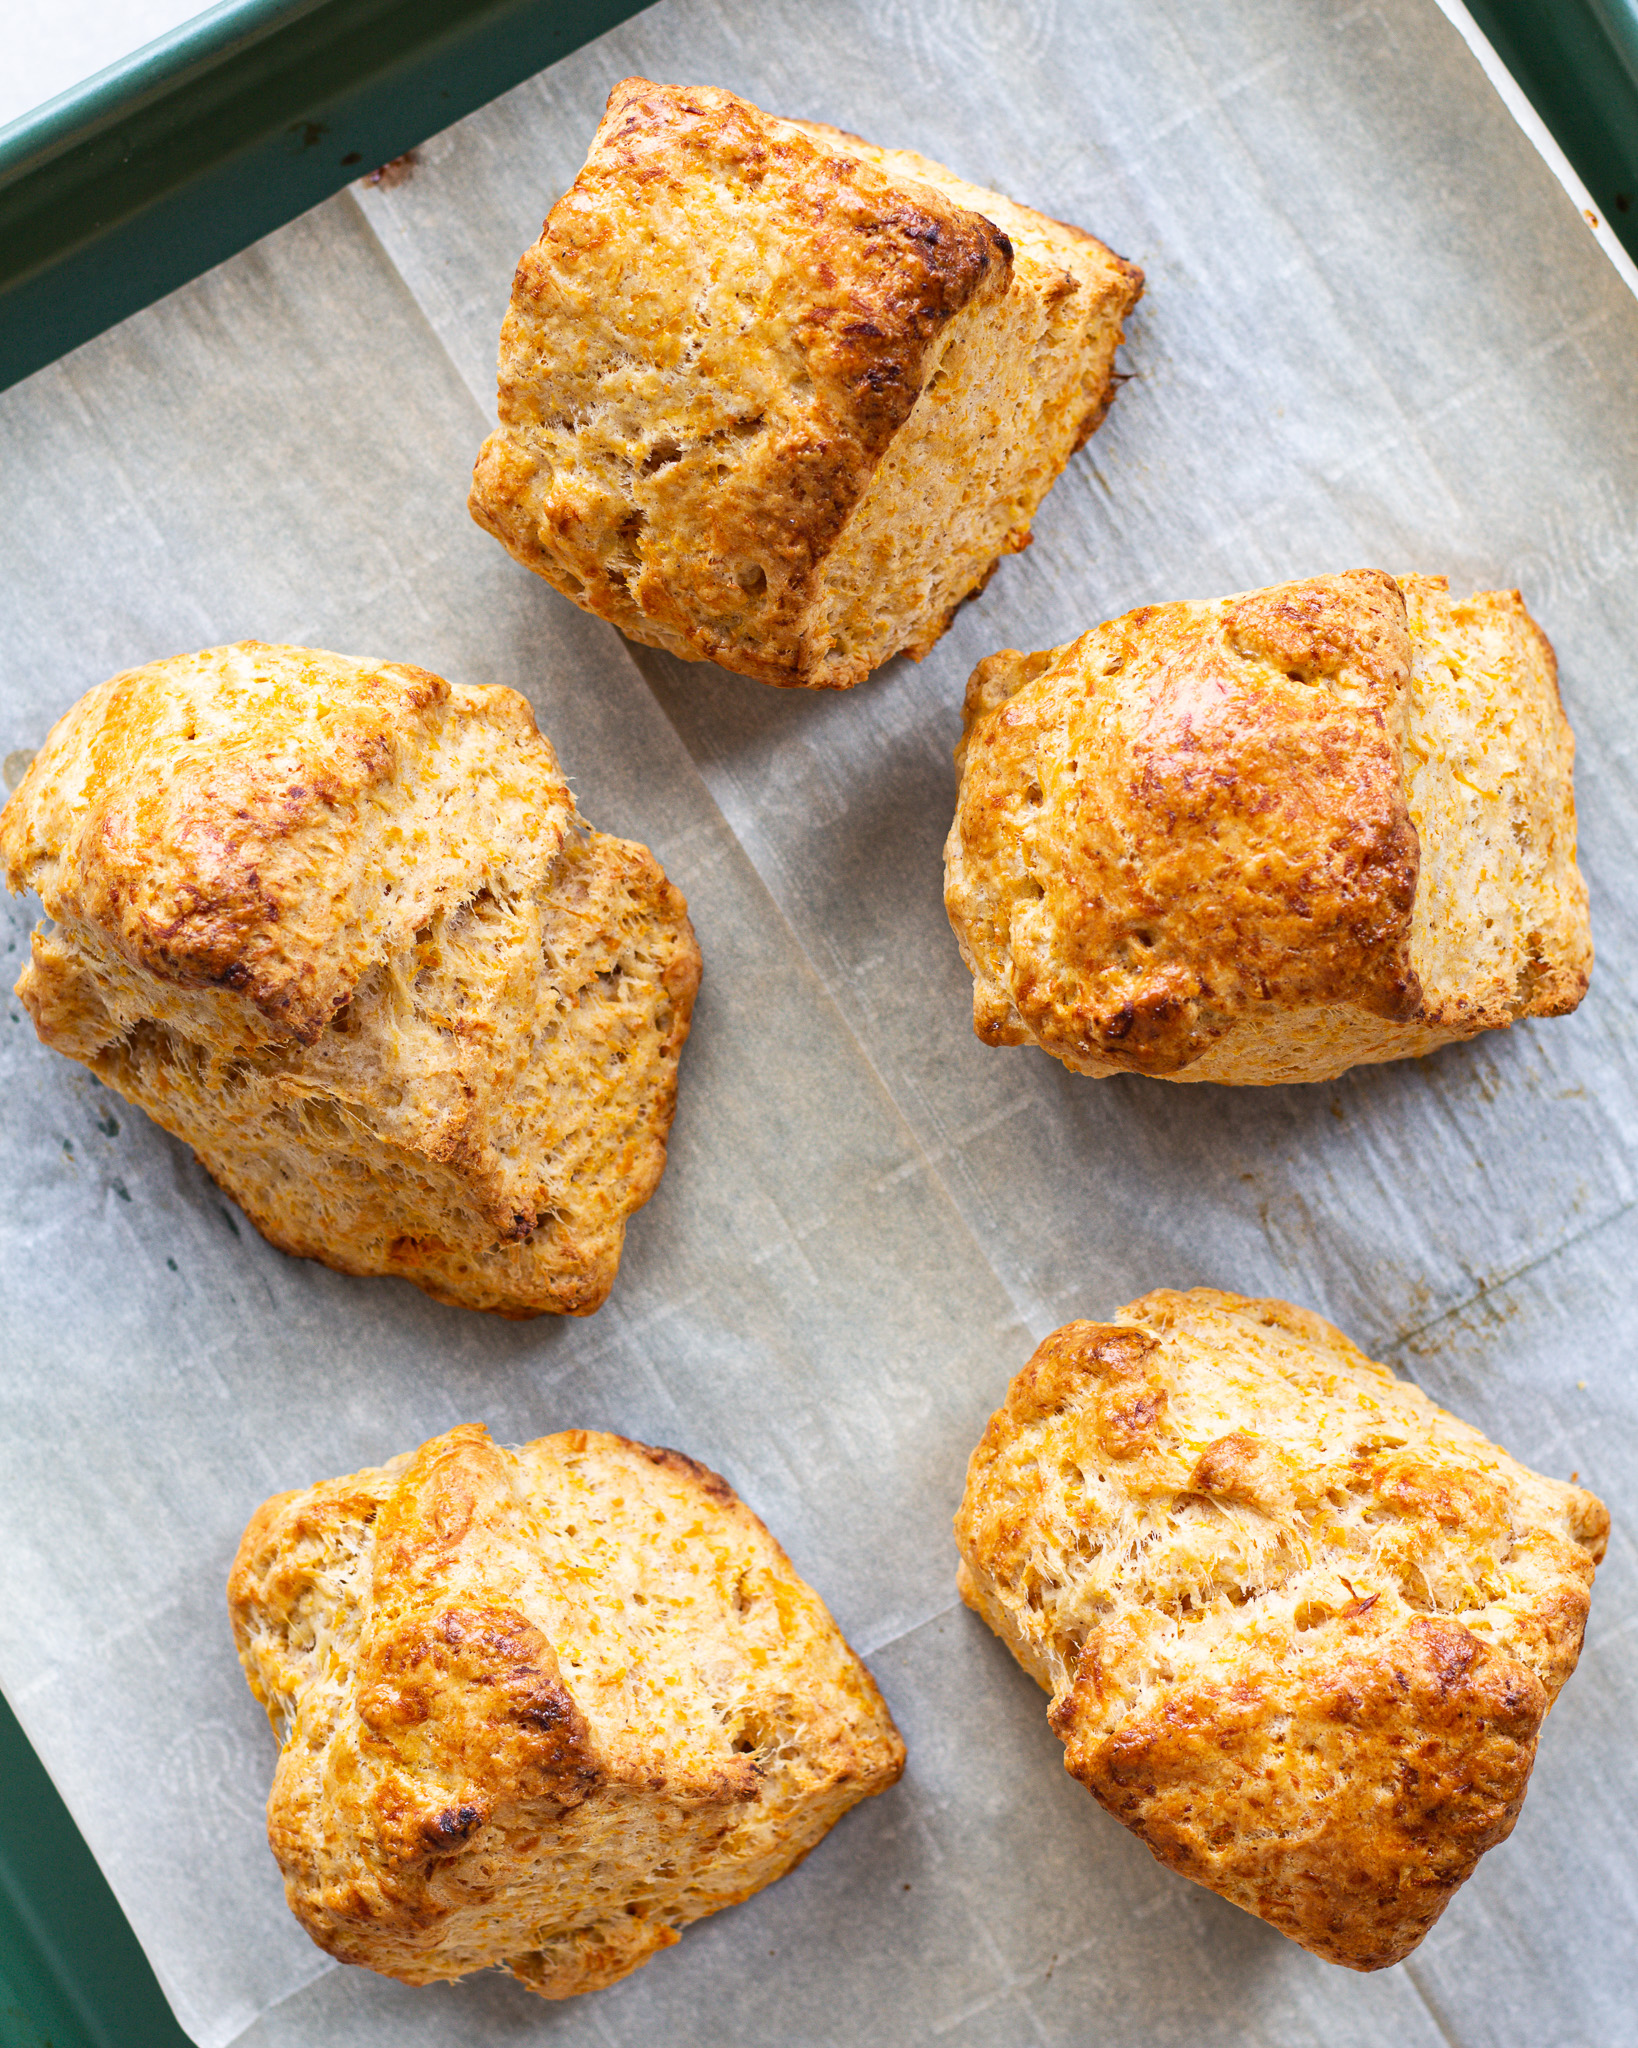
Carrot Butter Biscuits

Cranberry Nut Biscuits with Butternut Squash Butter
And that’s everything for these Camembert & Roasted Pear Biscuits!
If you make it, please tag me on Pinterest or Instagram so I can see! It’s my favorite thing to scroll through stories and see what you all are making.
And of course feel free to leave any questions, comments or reviews! This is the best place to reach me, and I’d love to hear from you <3
Watch the recipe here
The video may not fully represent the recipe. For best results, follow the instructions as written.

Equipment
Ingredients
- 1 small pear, 150 grams before coring
- 226 grams salted butter, 2 sticks
- 100 grams camembert cheese, 3.5 ounces
- 420 grams all-purpose flour, 3 cups
- 1 tablespoon granulated sugar
- 1 tablespoon baking powder
- 2 teaspoons Diamond Crystal kosher salt
- 1 lemon, for zesting
- 3 tablespoons fresh thyme leaves, loosely packed
- 300 grams whole buttermilk, 1 1/4 cup, plus more for brushing
- 70 grams raw walnut halves, 2/3 cup
- 2 tablespoons brown sugar
- 1 egg white
Instructions
- Position a rack to the center of the oven and preheat to 375°F.
- Puncture the pear with a fork a few times, wrap it in foil and roast in the oven for 40-45 minutes or until softened throughout.
- While the pear is roasting, cube the butter into 1-centimeter squared cubes, spread them on a baking sheet and transfer them to the freezer to chill for at least 15 minutes.
- Cube the camembert (rind and all) into 1-centimeter squared cubes, add them to a bowl and transfer them to the fridge to chill for at least 15 minutes.
- In a large bowl, whisk together the flour, sugar, baking powder, salt, two teaspoons of lemon zest and two tablespoons of thyme leaves.
- Add the butter to the flour. Toss with your hands to coat each cube in flour, then press, flattening the cubes into discs. Continue to toss to make sure the butter is always coated in the flour. Add the cheese and mix into the dough. Pour in the buttermilk and mix into a shaggy dough. Transfer this to the fridge to chill while you slice the pear.
- When the pear is out of the oven, core and slice it into thin slices. Halve those slices crosswise and set them aside to reach room temperature.
- Pull the dough out of the fridge. Transfer it to a lightly floured surface and press it down into a 2-inch tall rectangle. Use a bench scraper to halve the dough. Put the halves on top of each other and press down, rotate 90 degrees and repeat. Dust the dough with more flour as needed, or when any butter or cheese is breaking out of the surface.
- Pat the dough down into a rectangle and cut it into thirds. Layer the pear slices on top of one piece of dough. Place another on top, layer with more pear, and place the last piece on top. Dust with flour and press this down into a rectangle no more than 2 inches tall.
- Wrap the dough in saran wrap and if needed, press it down with a rolling pin. Transfer this to the fridge to chill for 30 minutes.
- While the dough is chilling. Finely chop the walnuts and add them to a bowl with 1 teaspoon lemon zest, 1 tablespoon thyme leaves and the brown sugar. Whisk an egg white until frothy and mix it in with the walnuts.
- When the dough has chilled, cut it into 9 even squares. Transfer them to a parchment-lined baking sheet and brush with a thin layer of buttermilk.
- Spread the walnut mixture on top of each biscuit. Bake for 30-35 minutes or until very golden brown. Serve warm!


Comments
Are you baking the biscuits at 375?
Yes! The oven stays the same temp throughout.
Hi Justine,
I just made these and were AMAZING! A big hit in my household! I replaced the pear with an apple and half of the buttemilk with homemade yogurth and they turned our great. I discovered you last year through tiktok and your blog has been my wholy grail ever since. Thank you for this and all your other amazing recipes.
Greating from Colombia!
Isabella
Ahhh hello!! I’m so glad you made them and so glad you enjoyed them!
Justine,
I made these and I’m so excited to try them (they are cooling) but I didn’t see any rise in their height.
What did I most likely do wrong?
Hi there! First, biscuits are totally tricky, so don’t blame yourself! A lack of height could come from a lot of sources, the first is that the butter wasn’t cold enough (this can happen if the dough sits out while you prep the walnuts etc.) or that the butter pieces in the dough weren’t big enough. That’s the hard part about biscuits, the butter needs to be small enough to form a dough, but big enough to melt, let steam escape, and separate the dough into big, flaky layers. These biscuits are also supposed to only rise about 30%, due to the cheese and pear, so if you are looking for a 50% raise, you might have thought you did something wrong, but you didn’t. There’s just a lot going on in these babies! I hope this helped, and I hope the biscuits were still delicious!
This was one of those times where you, Justine, perfectly intuit everything that needs to get used up in my kitchen. I am so grateful! Such delicious results!!!
As an encouragement to others, I did need to really riff on the buttermilk (whole milk, heavy cream, oat milk, water, lemon juice, haha) and the cheeses (goat and white stilton) and used more than just thyme from my “poultry herbs” kit.
So so thrilled it worked out though! I’m beyond glad you made them – they’re a current favorite of mine!
I was worried about mine as the butter sort of melted out at a bit at first. If this happens to you don’t worry! They butter stayed in well enough and made the undersides nice and toasty and crisp! I LOVE THEM. Next on my list, the beans with orzo and crispy greens 🙂
So glad you liked it! And yes, that can happen if some butter chunks pop out of the flour, but I’m glad you found it didn’t hurt your biscuits – I always say the more butter the better imo 😉
Oh I’m absolutely on that same boat. In fact, we are butter tattoo sisters! Lmao thought that was funny when you showed it off so had to mention! Thanks for the amazing recipes!
I want to serve these at breakfast with houseguests. Can the dough chill in the fridge overnight or is that too long? I realize it may be more difficult to cut through. Perhaps 30 minutes the night before, cut through, then package back up tightly & return to the fridge overnight? I’m trying to minimize morning rush, but still crave deliciousness! Thank you!
Hello! I actually think an overnight chill will be a GREAT thing! If you chill in the fridge, they shouldn’t be too hard to cut. Proceed as normal, and happy baking!
These were good but weren’t as out of the park as some of the other recipes on this blog. I felt like they weren’t as flavorful as they should be given how many ingredients were going into this (lemon, cheese, pear, thyme, walnuts!) although some bites were better than others. I wonder if dicing the pear and cheese into smaller bites would make each bite more equal/flavorful? And maybe doubling the amount of thyme?
Hi Camile! Thank you for the feedback, it’s always good to know! I’d actually crank up the lemon and thyme if you are looking for more umph – and adding a squeeze of lemon juice to the candied walnuts wouldn’t hurt either. I hope this helps!
Hi Justine,
I was so excited to try this recipe but in the end I was a little disappointed.
I found the dough was too wet because I felt the buttermilk was too much?
When I baked them the butter was just oozing out onto the pan.
Taste was ok but I think I’m going to change it up next time and add cream instead of buttermilk. I’m going to incorporated small pieces of pear into my dough and see how it turns out.
Hi Mirella, I am so sorry to hear this! As I hope you know, I take my recipes and their testing very seriously and it’s always my worst fear when someone gets a lackluster result. At the sound of it, it feels like this might be a temperature or measurement issue. I have a video of the biscuits, and you can see the dough is pretty dry, meaning the buttermilk should be an amount that barely holds the dough together. Did you measure your flour by grams or by weight? And the butter oozing can happen if the butter happens to get too warm during the shaping process, which is why biscuits are tricky, but also why I opt to freeze the butter before making the dough. My one note would be that if you add cream instead of buttermilk, the moisture issue might be worse. Buttermilk has a lower fat content than cream, so it will impact the dough differently, where cream will make it heavier and less easy to work with. The lack of acidity in cream will also cause the biscuits not to rise, so I’d advise against it if you try this recipe again! My big notes would be to put the dough in the fridge every now and then if you feel it is getting too warm, and to dust it with flour liberally if you see any butter pockets begin to pop out. I hope this helps!
Leave a Comment
Made this recipe? Tell me all your thoughts or if you’ve got any questions!